After eating a number of my donations to making my work colleagues larger one of them requested a baking day at my place to learn some of my magic tricks (which just goes to show you can fool people … my only magic baking trick is to read recipes carefully and add vanilla to everything!!). Any reason to bake and I’ll be there … and this was a chance not to just make one thing, but multiple things – heaven for me!!!
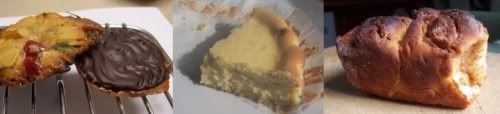
I took in a number of cook books for her to pick out ideas … and the menu was decided on: New York Cheesecake, Cinnamon Scrolls and Florentines. Florentines being the only one I haven’t made before, we used a cheesecake recipe I’ve been inflicting on people for years because I love it and the cinnamon scrolls we went for a Nigella recipe.
The one downfall in most cheesecake recipes (in my opinion) is the base … I know you need something to hold it together when serving, but I’d really just prefer more cheesecake than base. A little while ago I discovered a pastry that I actually liked when making a Caramel Chocolate Pistachio Halva Torte (I just need a large number of people to eat this and I’d make it again!). The halva pastry is very subtle but is something much nicer than a biscuit (or cookie for those in the USA) base. Originally from Epicurious I just halve the recipe (which makes two bases … as I often bake two smaller cheesecakes so I can give one away).
New York Cheesecake with Halva base
Halva Pastry (if making half the cheesecake mix, or making a single cheesecake then divide in half)
1 ¼ cups plain flour
½ cup plain halva (approx 3 ½ oz)
1 tblspn sugar
¼ tspn salt
½ cup butter (make it not a full cup)
1 egg yolk
1 tblspn vanilla
1 tblspn cold water (may not be required).
Pulse flour, halva, sugar and salt in food processor, add in butter, yolk and vanilla. Add water if it hasn’t come into clumps, form into ball by hand, wrap in plastic wrap and refrigerate. Divide batter between two small cake tins that are lined with baking paper. You can roll out this pastry, but we didn’t bother.
Cheesecake Mix (original recipe from Epicurious)
1kg cream cheese (original recipe calls for 8oz, but that is annoying since our packages come in 250g blocks – so I use 4 packs)
1 ¾ cups sugar
3 tblspn plain flour
Grated zest of 1 lemon
3 tblspn lemon juice (or to taste)
5 large eggs (or in my case – 1 goose egg and 2 chook eggs!)
2 large egg yolks
½ tspn vanilla essence or paste
Using an electric mixer, combine cream cheese, sugar, flour, and lemon zest/juice until smooth (you can use a food processor, but mine doesn’t contain quite the entire mix without making a mess!!). Add in eggs and yolks and vanilla. Don’t beat too much – you don’t really want air in it, just for it all to be mixed through.
P our into baking tin with crust. Bake for 10 minutes at 550degF or until just beginning to go golden (you don’t want brown at this point, just want it to puff up a bit and change colour a tiny bit). Lower oven temperature to 200degF (leave oven door open until you are sure it has dropped temperature). Bake for 1 hour (watch it doesn’t brown too much – cover with foil if it does). If baking in a single tin it may take up to 2 hours. Cheesecake is cooked when it is no longer wobbly in the centre.
Remove from tin and cool on a plate. Serve small slices – this is delicious!
Oddly this was the least eaten item at work – personally I can’t understand that, since I adore it … it could also be that at work they like un-messy items … a sticky cheesecake piece doesn’t quite meet that. Much easier to just grab a cinnamon scroll:
Norwegian Cinnamon Buns (Nigella Lawson “How to be a domestic goddess”)
Dough:
600g bread flour
100g sugar
½ tspn salt
21g (3 sachets) dried yeat
100g butte meltedr
400ml milk
2 eggs
Ok … so I cheated … I put all the ingredients into my breadmaker on a dough setting … and walked away!
The hand method would be to combine the ingredients, knead for about 5 minutes. Place in oiled bowl and put in warm spot for 25 minutes for the first rise.
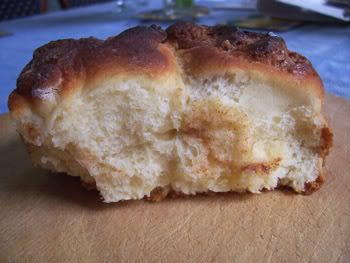
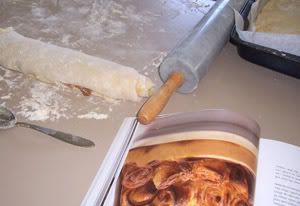
 Nigella instructs to take a third of the dough to make a layer at the bottom of a baking pan. Then to roll out the rest of the dough into a large rectangle. Then spread with the filling (I’ve doubled and changed the spices from the original … next time I’d even double the filling again from this).
Filling: mix together 150g butter softened (you want this to spread easily on the dough and not tear it), 150g sugar, 3 tspn cinnamon, 1 tspn allspice, 1 tspn ground ginger. Maybe even brown sugar would make them sticker?!
 Roll up the dough into a looooong sausage. Chop in half, then half again … then each section into 5 pieces. It doesn’t matter if it looks like the dough has squished together the layers – they’ll come back once you bake them. Place in the tin. Rise for 15 minutes until nearly doubled in size. Bake at 230degC for 20 minutes – you want them very brown, not just golden or they wont be baked through in the centre ones. Grab the parchment paper and buns and transfer them to a wire rack to cool. Eat!!
As bread can be quite temperamental, putting in three sachets of yeast seems to be an insurance policy – this bread is going to rise, and rise quickly!!! The outcome was probably a bread that is a bit sweeter than I like, but even though I doubled the filling – if I make them again I’ll probably make them even stickier and double it again!!! It really could take a lot more cinnamon/butter mix … and possibly also spread along the bottom layer. I assume the bottom layer is there so that the filling doesn’t leak to the bottom of the pan and brown too quickly … so if it is there to soak up more filling (which it didn’t in ours) then I’d like to actually make it work hard!!
Even though by the time they got to work they were nearly 2 days old – 10 seconds in the microwave and they were delicious again.
My sister had previously made up the original Nigella recipe for Florentines, so I got some hints from her about what I needed to change. First up was the almonds used – she recommended pre-sliced almonds rather than chunks (this could be because the ones we are used to buying all have slices not chunks so we have a preference for that), then she said to increase the flour a bit as her mix was too runny and spread out beyond the actual nut mix.
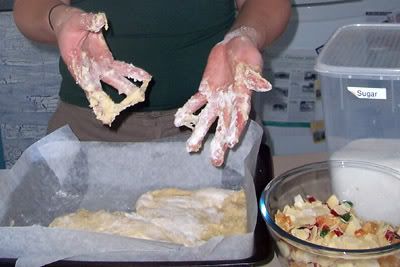
My additional changes were to add my own mixed peel. I can’t STAND peel, anything made with it is horrid, so I thought I’d try to make my own and see if I just didn’t like mixed peel vs just not liking manufactured stuff. Well, you wont be surprised when you find out that I love my homemade version – funnily enough candied peel tastes like … candy peel!!! Yummy sugary sweetness offset by a citrus tang. Easy to make – never again shall the horror of purchased peel come near my cooking! The only issue with the homemade version – it is very tempting to snack on, so storage is going to be a problem!!! Padlock maybe???
Candied Peel (Stephanie Alexander “The Cook’s Companion”
Citrus peel
Cold Water
Sugar
Icing Sugar
(note: all amounts depend on how much peel you start with!)
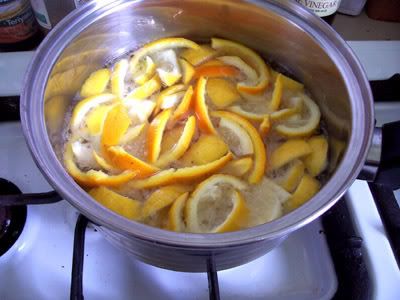 Juice citrus fruit (I used a mix of lemons and oranges ... 3 lemons, 1 orange) use juice for something else! Slice peel (including pith) into thin strips. Put in saucepan and cover with cold water and bring to boil. Drain peel, and repeat boiling with new cold water, repeat again. The repeated boiling removes the bitterness. Weigh your drained peel and add the same amount of sugar to the saucepan (with no water). Bring to the boil, and let bubble until the peel looks translucent (some of mine didn’t quite get there, still tasted nice, just not so pretty!).
 Place on wire rack to drain. Stepahanie’s instructions say this could take 12 hours to multiple days ... so with my impatience, I’m not into waiting ... I placed the rack over a baking pan and put it in a warm oven to help the syrup drain off faster – probably for about 10 minutes, then left over night. Cover with icing sugar and store in a sealed container – should last a couple of weeks.
Baking the Florentines – I knew they could be tricky and the first batch were a complete and utter mess … thrown in the bin! A slight change to my method – and out came a lovely version! They are like a brandy snap, they spread, except of course with a Florentine the nutty bits don’t spread leaving them in the middle and the mix burns on the edges whilst the centre stays uncooked. So I began by refrigerating the mix and instead of putting them in the oven and leaving them for the entire baking time, I took them out half way through, pushed in the edges, then baked again. A fix … but I’m still wondering if baking them in a muffin tin might work? Or some other form to enclose them so the edges aren’t thin. Looking at the ones you buy, they definitely don’t look like they’ve just been baked on a flat tray. I nearly attempted the muffin tin idea – but couldn’t face cleaning it out if it was a disaster … maybe when I have more time it might be worth a try!!

Florentines (original recipe Nigella Lawson “How to be a Domestic Goddess”)
100g flaked blanched almonds
80g candied peel (please don’t use the bought stuff … leave it out otherwise!)
40g glace cherries
25g unsalted butter
90g castor sugar
40g plain flour (Nigella calls for 15g)
150ml whipping cream
50g dark chocolate
50g white chocolate
Chop cherries and peel into small pieces (no bigger than a pea). Melt butter and sugar, stirring the entire time, add the flour and mix so it creates a ball. Remove from heat and add the cream. Stir in the fruit/almonds.
Refrigerate mix (trust me, makes it easier!). Place spoonfuls of mix on a lined baking tray … spread out the almonds etc, making it a bit thinner in the middle, the mix spreads a lot so don’t place them too close on the tray. Nigella’s instructions are to bake at 190degC for 10-12 minutes (this was a disaster for me!) … I baked them for about 7 minutes at 150degC, squished in the edges back to the nuts then put in the oven again for another 5 minutes until golden. Once they are cooked, you can’t move them immediately – but don’t leave it too long either. Wait until they are just firm, then cool on a wire rack.
Melt chocolates and drizzle over the backs of the Florentines, making wavy lines with a fork if that tickles your fancy!! Apparently the recipe makes 30 … but that includes the first batch you’re likely to stuff up!!!! I made mine quite small and got about 25 … plus the 10 or so I burnt!!
The one downfall in most cheesecake recipes (in my opinion) is the base … I know you need something to hold it together when serving, but I’d really just prefer more cheesecake than base. A little while ago I discovered a pastry that I actually liked when making a Caramel Chocolate Pistachio Halva Torte (I just need a large number of people to eat this and I’d make it again!). The halva pastry is very subtle but is something much nicer than a biscuit (or cookie for those in the USA) base. Originally from Epicurious I just halve the recipe (which makes two bases … as I often bake two smaller cheesecakes so I can give one away).
New York Cheesecake with Halva base
Halva Pastry (if making half the cheesecake mix, or making a single cheesecake then divide in half)
1 ¼ cups plain flour
½ cup plain halva (approx 3 ½ oz)
1 tblspn sugar
¼ tspn salt
½ cup butter (make it not a full cup)
1 egg yolk
1 tblspn vanilla
1 tblspn cold water (may not be required).
Pulse flour, halva, sugar and salt in food processor, add in butter, yolk and vanilla. Add water if it hasn’t come into clumps, form into ball by hand, wrap in plastic wrap and refrigerate. Divide batter between two small cake tins that are lined with baking paper. You can roll out this pastry, but we didn’t bother.
Cheesecake Mix (original recipe from Epicurious)
1kg cream cheese (original recipe calls for 8oz, but that is annoying since our packages come in 250g blocks – so I use 4 packs)
1 ¾ cups sugar
3 tblspn plain flour
Grated zest of 1 lemon
3 tblspn lemon juice (or to taste)
5 large eggs (or in my case – 1 goose egg and 2 chook eggs!)
2 large egg yolks
½ tspn vanilla essence or paste
Using an electric mixer, combine cream cheese, sugar, flour, and lemon zest/juice until smooth (you can use a food processor, but mine doesn’t contain quite the entire mix without making a mess!!). Add in eggs and yolks and vanilla. Don’t beat too much – you don’t really want air in it, just for it all to be mixed through.
P
our into baking tin with crust. Bake for 10 minutes at 550degF or until just beginning to go golden (you don’t want brown at this point, just want it to puff up a bit and change colour a tiny bit). Lower oven temperature to 200degF (leave oven door open until you are sure it has dropped temperature). Bake for 1 hour (watch it doesn’t brown too much – cover with foil if it does). If baking in a single tin it may take up to 2 hours. Cheesecake is cooked when it is no longer wobbly in the centre.Remove from tin and cool on a plate. Serve small slices – this is delicious!
Oddly this was the least eaten item at work – personally I can’t understand that, since I adore it … it could also be that at work they like un-messy items … a sticky cheesecake piece doesn’t quite meet that. Much easier to just grab a cinnamon scroll:
Norwegian Cinnamon Buns (Nigella Lawson “How to be a domestic goddess”)
Dough:
600g bread flour
100g sugar
½ tspn salt
21g (3 sachets) dried yeat
100g butte meltedr
400ml milk
2 eggs
Ok … so I cheated … I put all the ingredients into my breadmaker on a dough setting … and walked away!
The hand method would be to combine the ingredients, knead for about 5 minutes. Place in oiled bowl and put in warm spot for 25 minutes for the first rise.
Nigella instructs to take a third of the dough to make a layer at the bottom of a baking pan. Then to roll out the rest of the dough into a large rectangle. Then spread with the filling (I’ve doubled and changed the spices from the original … next time I’d even double the filling again from this).Filling: mix together 150g butter softened (you want this to spread easily on the dough and not tear it), 150g sugar, 3 tspn cinnamon, 1 tspn allspice, 1 tspn ground ginger. Maybe even brown sugar would make them sticker?!
Roll up the dough into a looooong sausage. Chop in half, then half again … then each section into 5 pieces. It doesn’t matter if it looks like the dough has squished together the layers – they’ll come back once you bake them. Place in the tin. Rise for 15 minutes until nearly doubled in size. Bake at 230degC for 20 minutes – you want them very brown, not just golden or they wont be baked through in the centre ones. Grab the parchment paper and buns and transfer them to a wire rack to cool. Eat!!As bread can be quite temperamental, putting in three sachets of yeast seems to be an insurance policy – this bread is going to rise, and rise quickly!!! The outcome was probably a bread that is a bit sweeter than I like, but even though I doubled the filling – if I make them again I’ll probably make them even stickier and double it again!!! It really could take a lot more cinnamon/butter mix … and possibly also spread along the bottom layer. I assume the bottom layer is there so that the filling doesn’t leak to the bottom of the pan and brown too quickly … so if it is there to soak up more filling (which it didn’t in ours) then I’d like to actually make it work hard!!
Even though by the time they got to work they were nearly 2 days old – 10 seconds in the microwave and they were delicious again.
My sister had previously made up the original Nigella recipe for Florentines, so I got some hints from her about what I needed to change. First up was the almonds used – she recommended pre-sliced almonds rather than chunks (this could be because the ones we are used to buying all have slices not chunks so we have a preference for that), then she said to increase the flour a bit as her mix was too runny and spread out beyond the actual nut mix.
My additional changes were to add my own mixed peel. I can’t STAND peel, anything made with it is horrid, so I thought I’d try to make my own and see if I just didn’t like mixed peel vs just not liking manufactured stuff. Well, you wont be surprised when you find out that I love my homemade version – funnily enough candied peel tastes like … candy peel!!! Yummy sugary sweetness offset by a citrus tang. Easy to make – never again shall the horror of purchased peel come near my cooking! The only issue with the homemade version – it is very tempting to snack on, so storage is going to be a problem!!! Padlock maybe???
Candied Peel (Stephanie Alexander “The Cook’s Companion”
Citrus peel
Cold Water
Sugar
Icing Sugar
(note: all amounts depend on how much peel you start with!)
Juice citrus fruit (I used a mix of lemons and oranges ... 3 lemons, 1 orange) use juice for something else! Slice peel (including pith) into thin strips. Put in saucepan and cover with cold water and bring to boil. Drain peel, and repeat boiling with new cold water, repeat again. The repeated boiling removes the bitterness. Weigh your drained peel and add the same amount of sugar to the saucepan (with no water). Bring to the boil, and let bubble until the peel looks translucent (some of mine didn’t quite get there, still tasted nice, just not so pretty!).Place on wire rack to drain. Stepahanie’s instructions say this could take 12 hours to multiple days ... so with my impatience, I’m not into waiting ... I placed the rack over a baking pan and put it in a warm oven to help the syrup drain off faster – probably for about 10 minutes, then left over night. Cover with icing sugar and store in a sealed container – should last a couple of weeks.Baking the Florentines – I knew they could be tricky and the first batch were a complete and utter mess … thrown in the bin! A slight change to my method – and out came a lovely version! They are like a brandy snap, they spread, except of course with a Florentine the nutty bits don’t spread leaving them in the middle and the mix burns on the edges whilst the centre stays uncooked. So I began by refrigerating the mix and instead of putting them in the oven and leaving them for the entire baking time, I took them out half way through, pushed in the edges, then baked again. A fix … but I’m still wondering if baking them in a muffin tin might work? Or some other form to enclose them so the edges aren’t thin. Looking at the ones you buy, they definitely don’t look like they’ve just been baked on a flat tray. I nearly attempted the muffin tin idea – but couldn’t face cleaning it out if it was a disaster … maybe when I have more time it might be worth a try!!
Florentines (original recipe Nigella Lawson “How to be a Domestic Goddess”)
100g flaked blanched almonds
80g candied peel (please don’t use the bought stuff … leave it out otherwise!)
40g glace cherries
25g unsalted butter
90g castor sugar
40g plain flour (Nigella calls for 15g)
150ml whipping cream
50g dark chocolate
50g white chocolate
Chop cherries and peel into small pieces (no bigger than a pea). Melt butter and sugar, stirring the entire time, add the flour and mix so it creates a ball. Remove from heat and add the cream. Stir in the fruit/almonds.
Refrigerate mix (trust me, makes it easier!). Place spoonfuls of mix on a lined baking tray … spread out the almonds etc, making it a bit thinner in the middle, the mix spreads a lot so don’t place them too close on the tray. Nigella’s instructions are to bake at 190degC for 10-12 minutes (this was a disaster for me!) … I baked them for about 7 minutes at 150degC, squished in the edges back to the nuts then put in the oven again for another 5 minutes until golden. Once they are cooked, you can’t move them immediately – but don’t leave it too long either. Wait until they are just firm, then cool on a wire rack.
Melt chocolates and drizzle over the backs of the Florentines, making wavy lines with a fork if that tickles your fancy!! Apparently the recipe makes 30 … but that includes the first batch you’re likely to stuff up!!!! I made mine quite small and got about 25 … plus the 10 or so I burnt!!

No comments:
Post a Comment